Ever since we’ve published our article about sending MP3 files via WhatsApp on iOS, a lot of our readers have been asking for ways to save received audio files from WhatsApp. Usually, it’s easy to save received photos and videos in Camera Roll (iOS) or the WhatsApp photo album in Photos app (Android and Windows Phone). But saving audio (Voice Messages, Songs, etc.) files from WhatsApp is a bit tricky.
Depending on the platform, WhatsApp stores received audio and voice files in different locations. If you are on Android, you might be able to locate saved WhatsApp audio files with the help of suitable File Manager apps. But on iOS and Windows Phone, suitable exporting options are not directly available for received audio files.
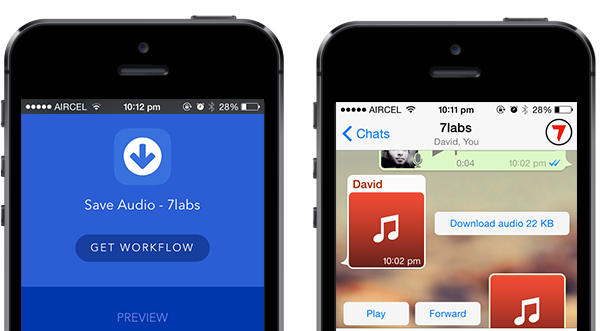
Save WhatsApp audio on iPhone
On iOS, WhatsApp stores audio files within its own isolated app storage, which cannot be accessed by other apps. To export and save received audio files from WhatsApp on iPhone, you need an app called Workflow. Workflow is a useful app that allows you to create custom workflows combining one or more basic operations available in iOS. The app costs $2.99 and can be downloaded from the App Store.
We have already created a custom workflow for exporting files to other apps, using the Workflow app. All you need to do is to install the app and get our custom flow. You’ll then be able to export audio files from WhatsApp conversions to any suitable file manager app. In this demonstration, we have used Documents app as the file manager.
- Download and install Workflow app from the App Store.
- If you don’t have Documents app installed, get it from the App Store too.
- Open this workflow page on iOS Safari browser and tap on GET WORKFLOW link. The custom workflow will automatically get added in the WorkFlow app.
- Now open WhatsApp and pick the conversation containing the desired audio file you want to save.
- If the audio is a voice message, it should be downloaded automatically. If it is a music (MP3) file, download the audio by tapping on it.
- Scroll to the top of the conversation thread and tap on Edit button to enable selection mode.
- Now, select the specific audio message from the conversation and tap on the Share button in the bottom left corner. This will bring up the Share menu.
- Tap on the “More” button in the Extensions section (bottom row), and from the list of available Activities, enable “Run Workflow”.
- Tap on Done in the top right corner. You should now see the Run Workflow extension in the Share menu.
- Tap on Run Workflow from Extensions in Share menu. It will open the list of workflows available in Workflow app.
- Select “Save Audio – 7labs” from My Workflows. A popup will ask you whether to run the workflow or not.
- Tap on Run Workflow to access the Open In menu and select Documents app from the list.
The audio file will be saved to the Documents app and will automatically start playing. You can now use this file for personal use or transfer it to other locations according to your preference.
If you want a free solution for saving audio files from WhatsApp on iOS, you can export the file using Mail or Messages from the Share menu. If you want to transfer the file from one Apple device to another, you can also use the AirDrop option.
Save WhatsApp audio on Android
Thanks to Android’s not-so-closed architecture, you can directly access downloaded audio files from WhatsApp conversations. The following steps will guide you to export audio files from WhatsApp on Android, using a suitable File Manager like ES File Explorer.
- Download and install ES File Explorer from Google Play Store, if not already installed.
- Using ES File Explorer, browse to the /sdcard/WhatsApp/Media/ location.
- If you’re looking for a received voice message, go to the WhatsApp Voice folder. If you’re searching for other received audio files, look into the WhatsApp audio folder.
Files will be organized into date-wise folders. Once you have located the right audio file, just copy it and save it to a location of your choice. You may also save WhatsApp audio files to your computer via USB transfer.
Save WhatsApp audio on Windows Phone
Due to the closed ecosystem of Windows Phone, there is no way to export received WhatsApp audio files from your phone. But you can download the received audio files to your computer with the help of WhatsApp Web.
For those who are unaware, WhatsApp Web is a new feature that allows you to chat with your WhatsApp contacts on your PC/Mac. However, for this to work, you need to be connected to the Internet on both your computer and your WhatsApp activated device. WhatsApp Web is right now available for all popular smartphone platforms except iOS.
In order to use WhatsApp Web, you need to register your computer on WhatsApp using the Windows Phone app. On your computer, open Chrome, Firefox or Opera Mini and navigate to “web.whatsapp.com”. A QR Code will be displayed on screen.
- Open WhatsApp on Windows Phone and tap on More (…) button in the bottom right corner of the screen and select “whatsapp web” option. A QR Code scanner will be launched.
- Scan the QR Code displayed on your computer using the WhatsApp QR Code scanner. Once verified, you can access your WhatsApp chats from the registered computer.
- Find a received audio in a particular conversation and click on the chat dialog to open the audio in preview mode.
- In the preview mode, click on the Download icon on the top right corner to download the file.
Thus the selected audio file will be saved to your computer.
Note: The above method for saving received audio files on WhatsApp works with all platforms that supports WhatsApp Web (such as Android and BlackBerry).
If you know of any other ways to save audio files from WhatsApp conversations, tell us about it in the comments below. Subscribe to our newsletter for more interesting articles like these.
Thank for your writting. Also to download more ringtones for Whatsapp you can refer to at: https://sonnerietelephone.net/whatsapp/
ReplyDelete